Showing posts with label diy. Show all posts

{ before + after } bedroom furniture

i've always been a compulsive improver, a serious DIY addict. i can't look at anything without thinking how i can make it better! this trait came in handy while decorating the apartment (on a budget!), as so many things can be transformed with a little patience and a few swathes of paint. here are two of my favorite makeovers:

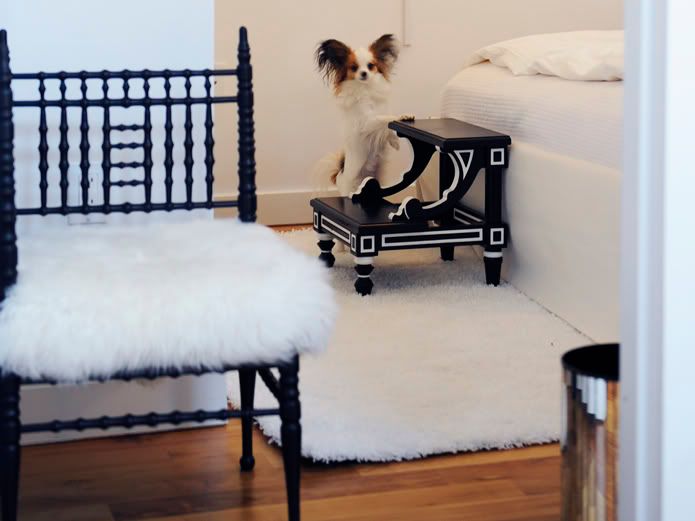
this bedside stool was a surprise score. i'd been looking for a chic step stool for a while, but they are surprisingly hard to come by. when my guy texted a photo of this one to me (from a yard sale in the hamptons), i knew it had incredible potential. only problem was, the seller didn't want to let it go without the matching (ginormous) bed frame. i insisted that he be persistent, threatening: "don't you dare come home without it!!" in the end, it took four trips to the woman's house over the course of two days, plus a whopping $30 to wear her down. the day he returned home victorious, i set to work painting our prize!

as you may have gathered from this photo, it serves a vital function to my pampered pup. while i'll be the first to admit that pooch is spoiled rotten, installing steps for her to get into bed was more about my convenience than hers ~ i hated being woken up every time she got the urge to cuddle! i also use it as a perch while putting on shoes, and as a way to reach the purses at the tippy-top of my closet.

this dresser came from craigslist. it was pretty banged up (as you can see) ~ but it was cheap, and its architecture (especially the quietly curved lines) reminded me slightly of the step stool above. i really liked that it had lots of little drawers on top to store my sunnies and accessories. luckily, a bit of wood glue (for that taped-together leg), some sanding, and a couple coats of paint went a long way; this project took only a day!
---
i hope this inspires you to look at that next yard sale find with a more open mind ~ or even to rethink something already in your own home!!

{ how to } tie your own turban

you all know that i'm trying to grow my hair out, and have been brainstorming creative ways to hide its awkward in-between stages. enter the faux-turban! this fun headwrap works with almost any haircut ~ and luckily, all you need is a lightweight, vintage silk scarf (30" square is ideal) and a little ingenuity to pull the look off!!
{ outfit above originally posted in full yesterday }
begin by folding your square-shaped scarf on the diagonal, like so:

center the long, folded side of the scarf at the nape of your neck...

...and pull the left & right-side pieces up to the top of your head. then, knot them once...

...like so:

next, pull the same pieces you just knotted around to the back again:

and tie them into a double-knot:


tuck the tail-ends of that knot under the side pieces:

finally, grab the piece hanging out in front and pull it up and under, tucking the tip of it into that first knot you made at the top of your head...

...and voila!! the result is a little bit rockabilly, a bit boho ~ and totally easy to execute (seriously, it takes about 4 seconds from start to finish). so have fun with it, let me know in the comments if you have any questions, and please post photos to my facebook page if you decide to work the look yourself!
-----
{ PS: for more inspiration on how to wear it, i've rocked the look HERE, HERE, and HERE! }
~ like the idea? then be sure to check out my other scarf-centric DIY project!!

{ glamourai DIY } instantly stately


{ above: reworked antique/estate jewels from my private collection }

i love the look of estate jewelry, especially articulated rhinestone pieces that have developed a smokey patina over time (like the yummy stuff above!). unfortunately, such gems can be either hard to find or stunningly expensive. on the other hand, modern replicas may be more affordable, but they often lack a certain depth ~ to my mind, new, too-shiny jewels always look cheap. good thing i've got a trick for faking the estate look!

here's what you do: start with a rhinestone necklace (or earrings, bracelet, etc...). recently, i fell in love with this 3D floral stunner while culling pieces for my f21 store. although it's undoubtedly a pretty piece as is, i imagined it might be a bit too glitzy ~ even for my taste! however, i knew it would be perfect for this project.

other than that, you'll need:
- paper towels to protect your work surface
- a black AND a brown sharpie pen (fine point is preferred)
- a handful of Q-tips
- nail polish remover (optional)

first and foremost, cover your workspace with paper towels; permanent marker does NOT come off tabletops! next, start smudging brown sharpie over the stones; to get that naturally aged look, occasionally skip a stone or two. you want it to look a bit random (as organic aging tends to be). blot the ink up with a moistened Q-tip (dipped in water!) as you go:

next, trace back over the stones with the black sharpie (continuing to blot with damp Q-tips as you move along). layering black over the brown adds dimension, making the stones look more naturally smokey:

for the sake of this tutorial, i completed the right side first, so that you'd be able to compare the desired finish with the original starting place (ie, the left side):

after continuing the same work on said left side, i realized i'd gone a bit too dark overall. that's easy to do ~ but just as easy to fix! simply dip one of your Q-tips in a bit of nail polish remover, and sweep it over the top surface of the stones. use a light touch on this step ~ that will help bring the shine back to the tips of the piece, while maintaining the shading around the sides of the stones. and voila! that's all it takes:

see the difference?! this transformation is definitely (intentionally) subtle; because, as we all know, chic is in the details!

let me know in the comments if you have any questions, and send me pictures if you decide to test this out for yourself!! as always, please keep in mind that you don't have to buy anything new to do this project ~ just dig around in your jewelry box for anything a bit too blingy and try giving it the antique treatment!

{ apartment projectory }

passed a major milestone in the decorating process this week, by having the window shades in my living room re-framed and lowered, to create loft-like skylights while maintaining privacy in the apartment. no photos yet, but believe me when i say it really changed both the architecture and atmosphere of my space ~ and got me jazzed afresh to finish the place!

were my budget significantly bigger, the process would go much faster. but we all know that limitations are helpful for encouraging creativity (yeah yeah yeah...), so i've gone back to ye olde inspiration files and dug up some more home decor DIY ideas. here's a bit of what's spinning my wheels right now:

above: how lovely (and easy!) would it be to recreate this vignette? perfect for an entryway! // below: flea market paintings are given a brilliant new life, decoupaged to old chairs.


above: these side tables are made from vintage lamp bases. genius! // loving the splatter-paint effect below ~ could be applied to so many things: thinking white chairs, lampshades... what else?!

{ at the moment, my favorite decor blogs are: desire to inspire, design sponge, decor8 & coco+kelley. most of these images are probably from one of those four; unfortunately, i haven't kept track! bad blogger. but check them out! }

{ DIY } curly locks

ever since my hair's gotten long enough for me to wear curly, i've been getting a ton of questions about how exactly i achieve those spiraled tresses. to follow is my not-so-secret strategy.

it's worth first noting that, if left alone to its own natural devices, my hair looks like this:

before curling it, i begin by pinning the top half up. i divide the pinned parts into three chunks: left, right and back (each of which will be attended to individually). i use CLIPS SIMILAR TO THESE:

using THIS CURLING IRON, i begin curling the left side. i always leave the tips of my hair outside the curling iron's clamp (in other words, i start the curl about 1" in on each length of hair). always curl towards the back of the head:

i do the right side the same way, always curling toward center back:

next, i let down the clip holding the top layer of hair on my left side. i curl it in small sections, still rolling each toward the back:

then, i let down the back clip and curl that section. things can get a little awkward here, but practice makes perfect:

at this point, i use my fingers to brush out / muss up what's already curled, then apply a generous mist of hairspray (just about any brand will do):

finally, i do the right / front section. here especially, make sure to remove the curling iron in the direction of each curl. it helps set the shape as the heat is slowly released:

another rigorous finger-combing, another coat of hairspray...

...and i'm done!!

{ can't get enough } DIY ideas for the home

because i've long since grown out of dollhouses, i'm dreaming of new ways to use all the miniature chairs i still love...
{ speacking of, have you seen this genius jewelry stand?! }


...as well as the full-size chairs i also adore, but have no place for (their storage becomes storage (becomes storage)):

can anyone else envision the football atop this task lamp being replaced with a handbag, or dashing hat? seems completely feasible to me:

and now that i've repainted all my old furniture and frames, how about adding some subtle, unexpected stenciling:

or, for a far less understated effect, perhaps i could cover a mirror (or table top or toilet seat cover!) with an iced topping of beautiful bijoux:

{ image credits: 1/ unknown 2/ apartment therapy 3/ wary myers 4/ design sponge 5/ moodboard }

{ glamourai diy } the scarf-tan-ette


as promised in yesterday's post, i've got a fun DIY project for you today: how to make your own summery (caftan-esque) scarf dress!

like me, many of you probably have hoards of vintage scarves buried away in your closet, but you can't figure out ways to wear them. if not, they are super cheap and easy to find at your favorite vintage store/thrift shop/flea market. this is a great way to put them to new use!

you'll need:
- 2 silk scarves
- straight pins, sewing machine, thread
- 4 grommets
- approximately 20-22" chain (use old thrift store jewelry!)
- jewelry pliers to manipulate chain

the combination possibilities for this project are endless, but i decided to start with two scarves that were fairly similar in size (approximately 31" square), and in pattern (horse bit/bridle motifs). i also liked the neapolitan-ice-cream-esque palette they evoked together:

i chose to use the pink scarf on the top (front of dress) and the brown scarf on the bottom (back of dress). i began by pinning the two together...

... to create an hourglass shape:

please note two important things:
(1) you want to keep this shape a little over-sized (in relation to your body). this is a no-zip dress, so you must make sure it can slip on & off easily. laid flat, the measurements i used were: 17" at the top opening, 15" at the waist, and 22" at the bottom opening. consider this a size small, and add more or less room according to your own perfect proportions.
(2) the hourglass shape is not sewn in straight (vertical) alignment with the sides of the scarves ~ instead, it is placed at a slight (left-hand) bias. this is important to establishing the asymmetric effect of the finished product.

---

sew the scarves together along the lines you marked with straight pins (again, reference the picture above). a sewing machine is preferred for this step (i use a kenmore elite), but if you don't have one, it could certainly be done by hand.

next, mark on both sides of the dress (either with thread or tailor's chalk) where your straps will go. plan on placing them approximately 10" apart:

you can either hand-stitch your chain straps directly to these points, or install grommets to loop them through. in most cities, you can have grommets done at your local upholstery store. however, if you happen live in new york, take your dress to steinlauf & stoller on 39th street, where nancy will hammer them in for you at $2 a pop!

using either your grommets or a needle & thread, attach 2 chain straps (it's up to you whether these match or not). the shorter strap (to be worn on the right) should measure about 8.5" long; the longer strap (to be worn on the left) should measure about 12-13" long.

laid flat, the finished piece should look like this:
i used a light colored thread, so that you'd be able to make out the lines of stitching (look closely!). also, pay attention to how off-center the straps are ~ this placement is paramount to achieving the correct drape.

here's what it looks like in 3D:


{ my DIY dress is worn with: vintage YSL sunnies, rachel rachel roy ear cuff & blazer, earrings from etsy, vintage belt & bracelets, LAMB shoes }

have fun and let me know if you have any questions!